
The control starts up in Incremental jog mode. In order to jog the axes in continuous movement, you need to press the INCR/CONT key to switch from incremental to continuous jog mode.
The Machine Home position is fully X- (carriage left), Y+ (table forward) and Z+ (head up).
|
The control starts up in Incremental jog mode. In order to jog the axes in continuous movement, you need to press the INCR/CONT key to switch from incremental to continuous jog mode. |
The control recognizes the following M functions:
M3 |
Spindle On Forward |
| M4 | Spindle On Reverse (Router only) |
| M5 | Spindle Off |
| M31 | Select Spindle #1 (Router) |
| M32 | Select Spindle #2 (Shaper) |
| M41 | Router Slide Down |
| M44 | Router Slide Up |
In normal operation, the Auxiliary keys on the jog panel have the following functions:
 |
Select Spindle #1 (Router) |  |
Select Spindle #2 (Shaper) |  |
No function |
 |
Router Slide Down/Up |  |
No function |  |
No function |
 |
No function |  |
No function |  |
No function |
| Aux10 | No function | Aux11 | No function | Aux12 | No function |
| Aux13 | No function | Aux14 | Maintenance Mode On/Off |
The PLC program can report various error and fault conditions, in addition to those listed in the Centroid operator's manual.
You can use the PLC Diagnostic display on the console to view some of the Centroid PLC input, output and memory locations mentioned with these error and fault conditions. At the control's main screen, press Alt-I to activate the PLC Diagnostic display. Press Alt-I again to dismiss it.
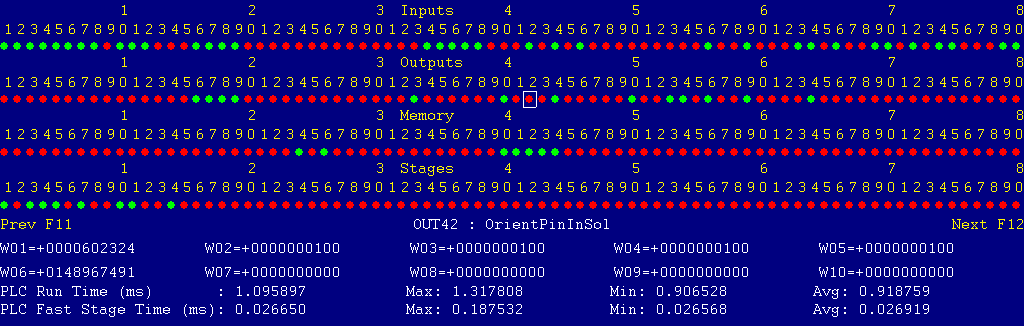
Each page of the Diagnostic display shows four rows of red and green dots: the first row shows PLC inputs 1 through 80; the second row PLC outputs 1 through 80; the third row PLC memory bits 1 through 80; and the fourth row PLC program stages 1 through 80.
You can use the arrow keys to move a highlight box over any of these locations. The name of the highlighted location will be displayed in the center of the screen below the red and green dots.
For example, in the illustration above the highlight box is on Output #42: The dot below the 2, to the right of the superscript 4, on the second line.
Below the four rows of bit status information are ten numeric ("word") variable values, labeled W1 through W10. Some of these variables also hold useful status information, described with the error and fault conditions to follow.
There are multiple pages of Diagnostic data. With the Alt-I diagnostic display showing, you can use the F12 and F11 keys to scroll right and left. For example, pressing F12 once will shift to the page showing inputs and outputs 81 through 160, and word variables W11 through W20.
Most fault conditions must be cleared by pressing the Emergency Stop button. Fault conditions have 9000-series message numbers.
Non-fault Error conditions generally cancel the program cycle and stop the spindle and coolant, but do not then need to be explicitly reset. Non-fault Error conditions have 8000-series message numbers.
Warnings and informational messages have 5000-series and 2000-series message numbers. They do not cancel the cycle or require any action to reset.

The overload relay on the shaper motor starter has tripped, probably due to excessive load on the motor, or to overly-frequent start/stop cycles.
Shut down the control, open the cabinet, and locate the shaper motor starter (M2) in the bottom right. Press the white RESET button on the overload unit at the bottom of the starter. Close the cabinet door and power back up.
References:
PLC INP13:	indicates MOL2 overload state: Green = 1 = tripped; Red = 0 = okay
Schematic:	Lines 32, 99
21-Aug-2014 MBL
![]()